Last weekend was full of festivities. Multiple bottles of champagne were popped and I was surrounded by love and smiles for four days. Between the graduation festivities and Mother’s Day, my family was quite busy with celebrations. As of Monday there’s officially a Dr. in front of my name, which makes my Mom mother to a doctor, which was a pretty awesome gift this year. But don’t worry, I got her other presents too :) And of course had to make something to eat! I opted for a fresh and healthy treat by making my own decorative fruit/flower bouquet inspired by those ridiculously expensive versions we all know (and love). My family was definitely impressed, and not only by my newly acquired D.M.D., but mostly by this beautiful and delicious fruit arrangement :)
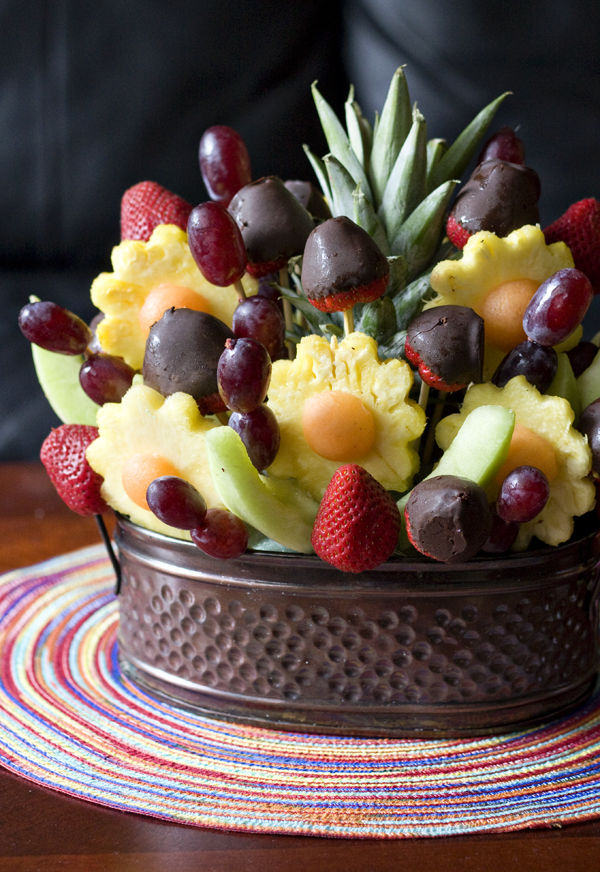
I want to say that this was really easy to put together, because it’s fundamentally not hard, but I just happen to hate cutting melons and pineapples. I still don’t really understand why these cost upwards of $60 store-bought, but if you caught me covered in pineapple juice with my counters a mess, I might have paid you a pretty penny to finish the job. If cutting up the fruit is the hardest task involved with this project though, it’s really not bad. I found a cute tin basket at a craft store to use as the base because I learned that I liked the lower and wider style of arrangements better. I trimmed down a half-dome styrofoam to fit in the tin and a variety of wooden skewers and toothpicks to get everything at the right height. It really was fun putting everything together and I loved filling in the holes and being OCD about making sure everything was even and balanced. I think it’d be a great activity for kids to get involved in (once the fruit is cut up obviously) – and there’s nothing like free labor to help get the job done!
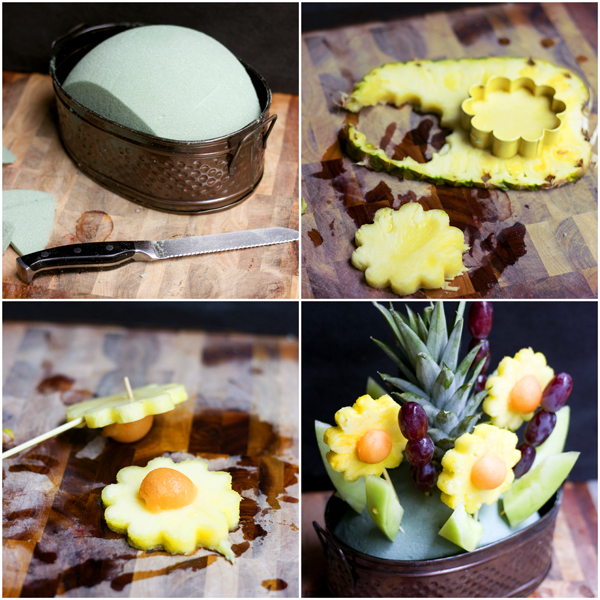
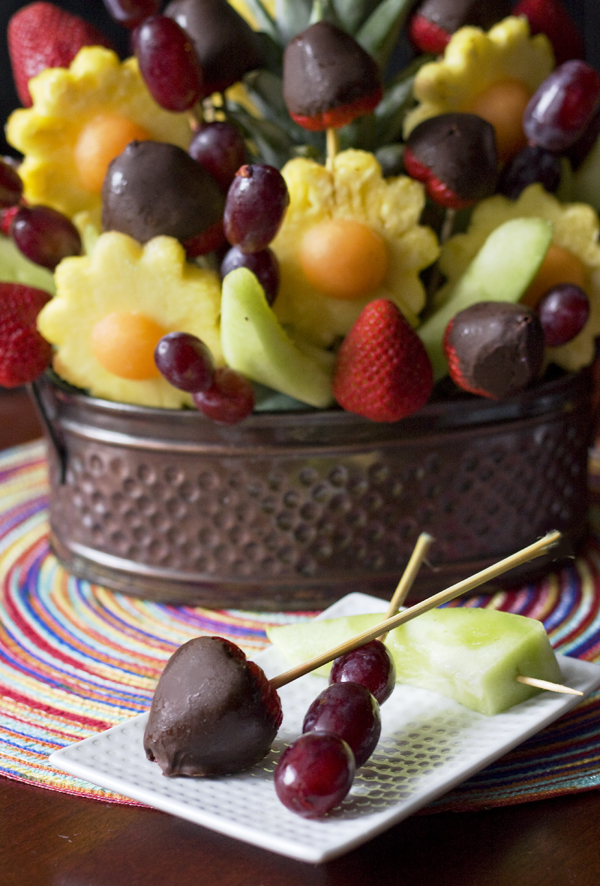
I wanted to include some step-by-step photos of the process just to help visualize what I did to get to the final product. The half-dome shaped styrofoam was great because it gave the arrangement a natural curve to start with and some height as well. All I had to do was trim the sides a bit to fit into my tin. For the pineapple flowers, I cut the pineapple into slices and used a flower cookie cutter to get my shapes. Cantaloupe balls were attached with toothpicks (I found this to be the easiest way, not sure how the pro’s do it though) and the pretty flowers were complete. I started with the pineapple stem in the middle and I loved that it gave me a starting point and some height from the beginning. Then I added a few pineapple flowers, lined the edge with honey dew wedges/”leaves” and started adding skewers of grapes at random. From there I just kept filling in, sometimes just adding a grape or 2 to cover a hole in the arrangement I tried to load up on the chocolate covered strawberries as much as possible because we all know those are everyone’s favorites.
Homemade Fruit Basket
Ingredients:
1 pineapple
1 honeydew melon
1 cantaloupe
1 bag red grapes
1 pint strawberries
1 package Baker's melting chocolate
Vase, tin, or basket
Styrofoam half-dome or rectangle
Skewers + toothpicks
Directions:
Start by getting all of your fruit ready. Cut the pineapple in slices lengthwise and use a flower cookie cutter to cut out shapes (I made 11 flowers). Cut the cantaloupe open and use a melon baller to make a dozen balls and use a knife to make a flat side on each one so they sit flat up against the pineapple. Use a toothpick cut in half to attach the melon ball to the pineapple flower. For the leaves, cut the honeydew melon in wedges.
Rinse your grapes. Rinse, cut, and dry the strawberries and melt chocolate according to package's instructions. Dip half of your strawberries in the chocolate and set on a wax-paper lined cookie sheet to allow the chocolate to set completely.
Start your arrangement by placing the pineapple stem in the middle, and then move out from there. Long skewers are good for the pineapple flowers and long stacks of grapes, and toothpicks were great for the honey dew wedges and smaller stacks of grapes. Keep working until you've got a nice rounded arrangement with no visible styrofoam. Keep refrigerated until ready to serve. I wouldn't recommend constructing it any more than 24 hours before you intend to serve it.
Here’s a photo from the weekend of the two ladies of honor – love you Mom!


Love that you made this yourself! They are so expensive to buy.
Lovely arrangement! It’s the perfect replica, if not even better looking. :)
Congratulations on becoming a Dr. :)
Congratulations Erica and many wonderful experiences in your new profession.
I once purchased an Edible arrangement for my niece who had heart surgery. True, very expensive arrangement! Your display looked awesome and were my favorite fruits. I am encouraged to try my hand at one since I’m newly retired. By the way, my niece is now a family practice physician.
Congrats!!!!
Instead of using a toothpick to attach the melon ball the the pineapple flower you could use the bakers chocolate. :D
I love this! So pretty and perfect for Spring! Congratulations :)
Congratulations on your monumental achievement!
What a great idea! It really does look exactly like those over-priced fruit bouquets! Oh, and congratulations on finishing school and becoming a dentist!
Hi, What keeps the fruit from turning brown.
Erica — October 11th, 2013 @ 7:38 pm
I don’t really have a trick for that, but I didn’t have any problems with my fruit browning in a 2-3 day period. Maybe spritzing with lemon juice?
Hey Erica, this is adorable!! Did you make this immediately before eating or did you make it in advance? I want to check if I could make it a day or so before serving it. Thanks! :)
Also, I was reading that some people who’ve made these sort of arrangements have problems with strawberries falling down the stick if they cut the green part off. I’m assuming you didn’t because you didn’t mention it, but I just wanted to check.
Erica — July 29th, 2014 @ 7:23 pm
Hi, I did make it a day in advance and it still held up well. I didn’t have any problems with falling strawberries, but maybe leave that part for last just in case? Good luck!
Please dont put that styrofoam near your food. You may not know it but it is so full of chemicals. I would use a peeled melon as the base.im sorry but i. Had to say something.
This short article was such a new good read of which I will surely suggest it for the buddies!
The last period I’ve read anything as professionally created was
with at https://ateliertheater.ch/cost-of-living-in-macau/. Thank a person for the professionalism and reliability and a watch for details.
Is going to be pleased to read even more of your respective writing!