As I get geared up to embark on the journey that is thank-you notes, I realized I never shared these photos I took of our wedding invitations. It may seem a little belated to share them with you one month post-wedding, but I loved how everything came out SO much I couldn’t not include them in my “Wedding Sweets” series here on the blog. I think wedding invitations are so important – they set the tone for the wedding to all of your guests and I truly believe a great invitation can make such a big difference in the guest experience! I spent lots and lots of time obsessing over every detail with these, and spent even more time handwriting the names of all of my guests. It was a labor of love, and I hope that everyone loved them as much as I did!!
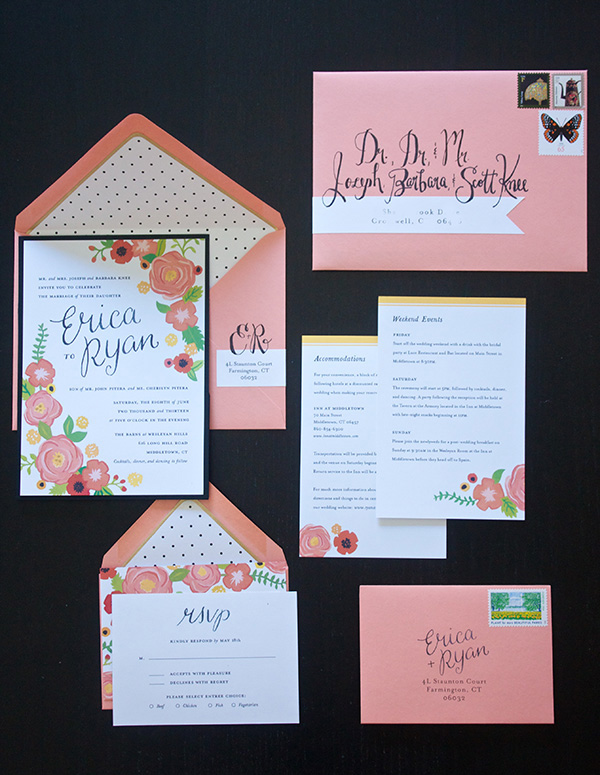
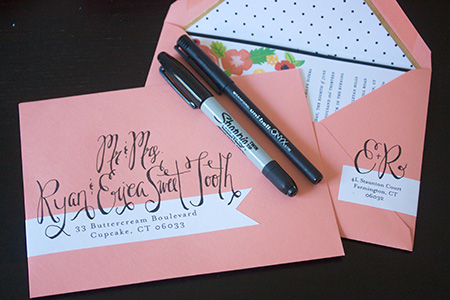
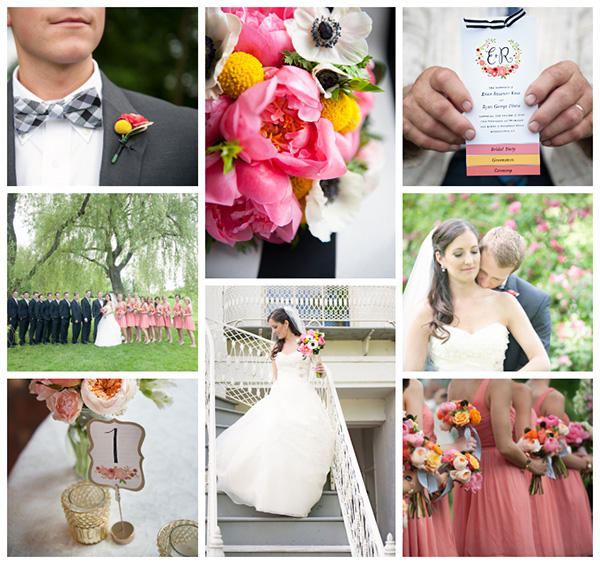
I had a very specific vision of what I wanted the invitations to look like but after scouring Etsy forever and ever, I couldn’t quite find what I was looking for. So I turned to my friend from undergrad and amazing designer Catherine Ray. She totally got my vision and exceeded my expectations with her hand-painted flowers and calligraphy. I mounted her design on a black pocketfold card and tucked the RSVP card and Accommodations/Weekend Events card in the little pocket. My colors were corals and yellows with black and white – kind of girly but hardened by the stark B&W contrast (the adorable envelope liners are from Paper Presentation). I carried over the flowers and typography into many other elements of the wedding, and I really loved how everything ended up matching and sort of branding our wedding. To make the envelopes super-duper special, I decided to do all of the names by hand. The addresses I printed on labels, but I added the black “calligraphy” myself. I put calligraphy in quotations there, because I wasn’t actually using a calligraphy pen – I faked it! I learned how to do this from Jones Design Company and decided to do my own little tutorial for you here too. And yes, this did take me about a million hours and I definitely sacrificed a few weekend nights out to finish them all, but I was just so obsessed with how they looked! So here’s my little tutorial for you today:
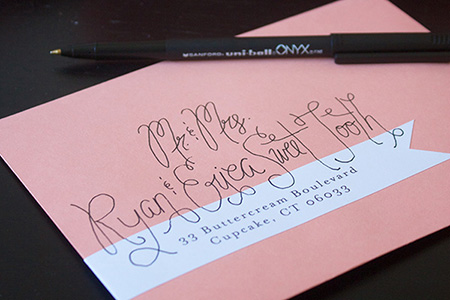
1. Write out the names in script with a fine tip pen. I used the font Carolyna Pro Black for inspiration. To see the different styles of letters for free, just use the Sample Text feature.
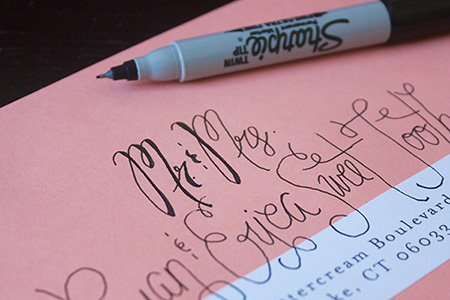
2. With a thin Sharpie marker, go back over the downstrokes of each letter. So if your pen moved in the downward direction on the page, this is the stroke you bold. This little touch is what really makes the script look special and almost like real calligraphy!
3. Finish all of the letters and sit back and enjoy your beautiful work. Oh, and don’t forget to repeat the process 100 more times for all of your other guests!
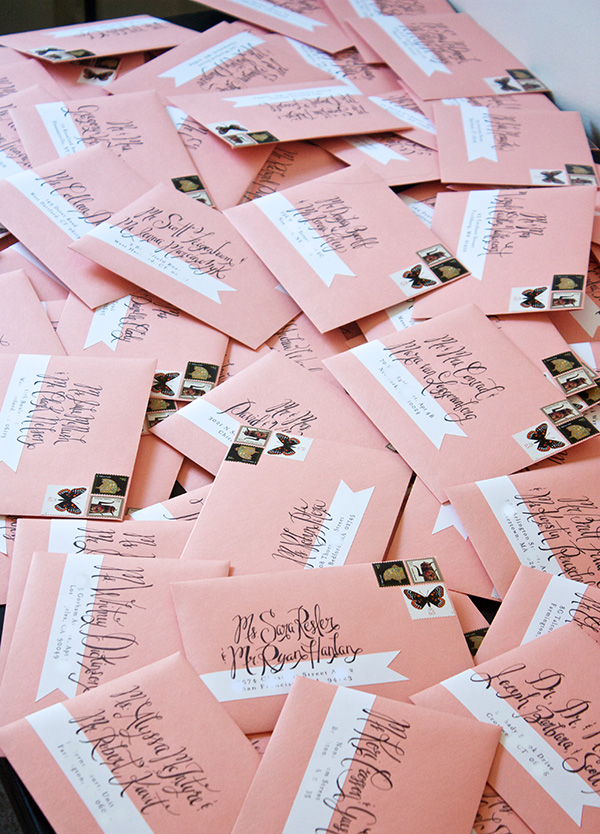
Even though some people probably just threw out the envelopes after opening the invitation, this is definitely where I poured the most of my personal effort for the invitations overall. I just really wanted my guests to see the envelope in their mailboxes and immediately get even more excited for our big day. I hoped the invitations exuded elegance, whimsy, a bit of my our personal style, and I wanted all of that to be apparent before even opening the envelope. With the perfectly colored envelopes (from Paper Presentation in Ginger), fun wrap-around address labels (from Paper Presentation in Solar White), a collection of different vintagey stamps from USPS, and my own creative and crafty efforts, I think I definitely achieved my goal! I love now having the skill to do this faux calligraphy, and I ended up using it on all sorts of signs and paper goods throughout the wedding. If you want to add a special touch to your stationary, I highly suggest giving this little trick a try! And because I just got to see my wedding photos for the first time this week, here is a sneak peek of a few photos, and a link to our wedding featured on our photographer’s blog!!
Wedding photos courtesy of Julie Morawski


What a stunning, beautiful wedding!!
Everything is so pretty and perfect! As alway I am enjoying your posts! Keep them coming :)
Congratulations!!! :)
Oh my gosh! Your wedding was perfect! You look so happy together. Love it!
Beautiful handwriting, almost too good!
Erica thank you for sharing your special day with all your followers. Those who follow you have anticipated seeing your lovely day, and what a beautiful day it was!!! I have two girls, and I to look forward to the day that I will be able to celebrate their special day. Thank you for showing us all what special touches one can add to their day. Your wedding photo’s, invitations and much more are just beautiful. Enjoy your life together, you both are very blessed. Congratulations !!
Lovely wedding! Your dress and flowers are gorgeous!
Do those labels have to be printed from an inkjet printer or can they be printed from a laser?
Erica — September 16th, 2013 @ 3:06 am
I think either would work!
thank you!
Where did you get the labels and what program did you use to print them?
Erica — December 31st, 2013 @ 2:10 pm
The labels can be found here: http://www.paperpresentation.com/mm5/merchant.mvc?Screen=CTGY&Store_Code=PPN&Category_Code=L_SOB7 and Paper Presentation gives you a template for Microsoft Word to use to print them. Good luck!
Love these! Well done! How far around does the white strip wrap? And did you put return address on it…perhaps on the back on the wrapped around label?
Erica — March 6th, 2014 @ 7:15 pm
They’re 7-1/2″ long, so it depends how much you decide to leave on the front vs. wrapped around the back. I think mine was about 2″‘ on the back and 5-1/2″ on the front. And yes, the return addresses are printed on the back, sorry I didn’t include a picture of that!
how did you create the wrap around label.
Erica — March 2nd, 2015 @ 8:57 am
I bought them at Paper Source and they came with a Word template that was helpful for the layout. Here’s the link – http://www.paperpresentation.com/mm5/merchant.mvc?Screen=CTGY&Store_Code=PPN&Category_Code=L_SOB7
Did you skip the option of using an inner envelope? It looks like you did based on what I can tell from the pictures?
Erica — May 1st, 2015 @ 3:38 pm
Yes, no inner envelopes. I didn’t think they were necessary for my type of invitation, but they’re definitely classy!
Hello! I ordered these labels after seeing how cute yours turned out! I just got them in the mail and am having a formatting issue. Did you have any problems with printing? How did you input all your addresses? I’m using Word. Thank you!
Erica — February 2nd, 2016 @ 9:03 am
I remember doing A LOT of troubleshooting to get it just right with the formatting. I used Word as well. I manually typed in all the addresses. Try printing on regular paper a few times and holding up to the label paper in the light to see if it matches up so you don’t waste too many labels. Good luck!!
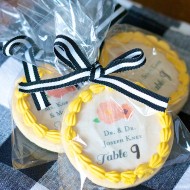
Can you tell me about your table numbers?? I love them!
Erica — February 29th, 2016 @ 2:06 pm
Glad you like them! I cut them out myself on card stock that had the floral flourish printed on it, and then painted the gold border on myself after. Then I drew on the numbers with black marker. Hope this helps!!
Hi! Wondering what font you used for the address labels? Just ordered the labels, love your look!
Erica — June 21st, 2017 @ 12:03 pm
Hi Molly! I believe it was Mrs. Eaves: https://www.myfonts.com/fonts/emigre/mrs-eaves-ot/