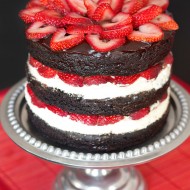
This beautiful and delicious cake is serving double duty today – as a festive holiday cake for inspiration to all of you as well as a birthday cake for a wonderful, red velvet/cheesecake-loving Mom. She’ll probably be mad that I hijacked her birthday cake to post something holiday-themed over here, but the cake was SO good, I don’t think she’ll complain too much. She said this might have even been my best cake yet! But that’s not surprising considering this is a layer of creamy cheesecake sandwiched between two layers of moist red velvet cake – it was hard to go wrong.

Apparently this recipe concept is borrowed from a staple on the Cheesecake Factory’s menu, the Ultimate Red Velvet Cake Cheesecake. “Ultimate” is definitely an accurate description for this concoction, and is probably applicable to everything else on their menu too. Normally I protest the Cheesecake Factory’s non-human portion sizes and overindulgent choices, but when it comes to dessert I make some pardons, especially for birthdays. And since the restaurant never takes reservations, I was happy to deliver this cake to my mom hassle-free, without a wait, and homemade. Okay so maybe the cake involves a lot of steps and can be interpreted as a “hassle” by some, but I had a lot of fun making it and the components are not individually difficult, just a little bit of work to put it all together. Definitely worth it in the end!

As if the inside of the cake is not beautiful enough, I decided to try out a frosting rose technique made famous by Amanda of i am baker for the outside. I used a cream cheese frosting to compliment the cheesecake and red velvet flavors, but the consistency was a little soft for piping and didn’t demarcate the roses as well as I would have liked. But overall the effect is there and you wouldn’t believe how EASY it is to pipe roses like this. Please check out Amanda’s tutorial so you can start impressing your friends and family with your piping skills pronto. I decorated this cake in under an hour during a lunch break last week, including clean up time, so it’s definitely doable during the busy holiday season!

The red velvet cake was moist and flavorful – an improvement from a previous red velvet recipe I’ve used – and the cheesecake was slightly tart and perfectly creamy. I paired it with my newly discovered favorite cream cheese frosting and topped it with a row of red candy-coated chocolates. I chose to adapt this recipe for a 6″ cake since I was only serving 5 people by adjusting the ingredients to be 2/3 of the 9″ recipe – but I’ve lost my calculations somewhere and am kind of lazy to do the math again. Let me know if you really want the 6″ recipe and I will go on a hunt!
Red Velvet Cheesecake Layer Cake
Recipe adapted from 17 and baking
Ingredients:
for the cheesecake layer:
20 oz full-fat cream cheese, at room temperature
2/3 cup granulated sugar
Zest of half a lemon
1-1/2 tsp fresh lemon juice
1/4 tsp salt
2 large eggs, at room temperature
1/2 cup sour cream, at room temperature
1 tbsp all purpose flour
for the red velvet layer:
2-1/2 cups cake flour
1-1/2 cups granulated sugar
1 tsp baking soda
1 tbsp cocoa powder
1 tsp salt
2 eggs, at room temperature
1-1/2 cups vegetable oil
1 cup buttermilk, at room temperature
1 tsp vanilla extract
1 tsp white distilled vinegar
Red food coloring, as desired (I used about 1 tsp of gel color)
for the cream cheese frosting*:
12 oz cream cheese, cold
6 tbsp unsalted butter, at room temperature
1 tbsp vanilla extract
4 cups powdered sugar
Directions:
for the cheesecake layer:
- Preheat the oven to 325 degrees and set a pot of water to boil.
- Grease a 9″ springform pan and line the bottom with a round of parchment paper. Wrap the outside of the pain with tinfoil to keep water out, and set the pan into a larger pan (for the water bath).
- In the bowl of an electric mixer, beat the cream cheese until light and fluffy. Add the sugar and beat until smooth.
- Switch to a wooden spoon or spatula and mix in the lemon zest, lemon juice, and salt.
- Add eggs one at a time, making sure they are combined but not overmixed.
- Add the sour cream and stir in the flour until just combined.
- Pour the batter into the greased pan and pour boiling water into the larger pan, halfway up the cheesecake pan.
- Bake until the cheesecake is just set in the middle – about 40 minutes.
- Run a knife along the sides of the pan and let the cheesecake cool completely by placing plastic wrap onto the surface of the cheesecake and refrigerating overnight in the pan.
for the red velvet layer:
- Preheat the oven to 350 degrees. Grease and flour 2 9″ pans.
- Whisk together the flour, sugar, baking soda, cocoa powder, and salt together in a medium bowl.
- In the bowl of an electric mixer, beat the eggs, oil, buttermilk, vanilla extract, and vinegar together until well combined.
- With the mixer on low, slowly add the flour mixture to the wet ingredients and beat until well combined. Add the food coloring until desired color is achieved.
- Divide the batter equally between the 2 pans. Bake 25-30 minutes or until a cake tester comes out clean, rotating the pans halfway.
- Cool the cakes in the pans for 5 minutes, then run a knife around the edges and invert them onto cooling racks to cool completely.
for the cream cheese frosting:
- In the bowl of an electric mixer, beat together cream cheese and butter until light and creamy. – Add the vanilla extract.
- Slowly add the powdered sugar and beat until well combined, about 2-3 minutes.
for assembly:
- I made the cheesecake and red velvet cake one night and let them both sturdy-up in the fridge overnight. The next day, I whipped up the frosting and assembled the cake.
- First, layer the cakes on top of each other and apply a thin coat of frosting and return to the fridge for 30 minutes. This is your “crumb coat”.
- If you’re decorating the cake as I did, apply another layer of smooth frosting to the top of the cake and leave the sides alone.
- Load the rest of the frosting into a piping bag fit with a large open-star tip and follow Amanda's rose tutorial to decorate the sides..
- Return to the fridge until ready to serve.
*Note: I made a whole batch of this cream cheese frosting for my 6″ cake, and didn’t have much left over, so if you would like to recreate the roses, I would suggest doubling this frosting recipe for a 9″ cake to make sure you have enough!
Happy Birthday Mom! Here are some pictures from her birthday celebration, including a low-light but delicious shot of the inside of the cake :)


Two of my favorite desserts combined together?! Perfect! Your cake is absolutely beautiful.
That is one heck of a cake! Looks amazing!
That is absolutely stunning! I wish I had the patience to make such pretty frosting on my cakes.
Happy b’day to your mom! Such a stunning cake :)
Can I please have the 6″ recipe? Its so rich I dont wanna have to eat a whole 9″ cake by myself ;)
Just drooled on my keyboard….seriously! Beautiful cheese-cake! Yum
Wow wow wow. You did an AMAZING job on that cake. Your mom is one lucky lady ;)
What a great idea and your cake looks so pretty!
Looks delicious. Would love for you to share your pictures with us over at foodepix.com.
That looks absolutely amazing! Great job :)
gorgeous, really. nice work.
Gorgeous cake!
WAW looks tremendous!!!!
I love your blog and your recipes and your pictures in the end all. I would like to ask you a favor, here in Spain do not know the recipes by the cup.In this recipe, I could facilitate grams equivalent to your cup?. Congratulations to your mom for compleaños and having a daughter so creative. Thank you so much
Oh. my. goodness. SPECTACULAR.
What a gorgeous and yummy looking cake!
I was wondering if you frosted in between the layers, or if you just stacked them on top of each other.
Anonymous – I just stacked them on top of each other, but feel free to add a layer of frosting if you wish.
Me encanta tu blog es super dulce y riquisimo,un saludo desde España.
When you placed it in the fridge – did you cover it in cling-wrap or you just left it in the fridge ‘open’ ?
I have a cake carrier that I can use to store my cakes in the fridge with, but I would imagine you can just leave it “open” as long as there aren’t any open raw meats or rotten things around!
Would it hurt if you didn’t add the lemon ingredients? I’m not a huge fan of lemon :)
Marilyn, you can leave out the lemon without a problem. I just like the extra kick it gives the cheesecake :) Enjoy!
That’s gotta be the most gorgeous cake I’ve ever seen! I made the mistake of showing the pics to my mom and mentioning that you made this for your mom, so she’s now expecting something this fab from me when her birthday rolls around, lol.
Kate, our colleague made this cake! i almost died… wowaweeewaaaaa
after you bake the cheesecake you wrapt it in saran wrap immediatly then out in frige? or you let it set out for awhile first? and you put in the frige with just the springform pan & foil still on it? I have made cheesecakes before but i always let mine sit in the oven (off after baking ) for several hours then put in frige, i’m just worried it’s going to be soft in the middle or giggly
Erica — March 27th, 2012 @ 4:11 pm
I didn’t take the cheesecake out of the pan – just put saran wrap over the top of the springform pan and put it in the fridge. You can let it cool completely in the oven (turned off) and then just put some saran wrap over the top to prevent a film from forming.
Made the cake and served it to a gathering of friends. All they could say was WOW! This is the most amazing red velvet layer cake I’ve EVER had. The combo of cake and cheese cake was perfect. This is definitely my ‘go to’ specialty cake.
Hi, this is such a beautiful cake! Would you have the 6″ recipe?
I would love the 6″ recipe as well.. I want to make this for my boyfriends birthday & I’m afraid the 9″ is way too much!! I’m afraid of calculating it all myself & messing it up!
lavoro stupendo!!!!
I’ve made this cake (including the rose technique) 4 times now and I have received rave reviews! I am making one tonight for a Holiday Party with my 11th and 12th grade Math students. They are very excited to try it…meanwhile, my daughter is at the hospital in labor with my first grandchild – Avery Margaret. Good times!
The cake’s very gorgeous! And I’m thinking of using it for our midterm exam next next Thursday (24 January 2013). Can I have the 6′ or 5′ maybe converted recipe, please? :)
Wow, that looks sinfully decadent and delicious.
I am making this cake as I email you for my son and future daughter in law’s couples bridal shower (valentine theme) . It looks amazing in your pictures. I hope I can do it justice. My house smells delish!!!! Finished the cheesecake part and now working on the red velvet. Thanks for the great idea!
Hi, i think that i saw you visited my blog so i came to “return the favor”.I am
attempting to find things to improve my site!I suppose its ok to use some of your ideas!!
There’s certainly a lot to learn about this subject.
I like all the points you’ve made.
Either at the second article or on the following page will be
the sales letter that is exactly what they wanted. Some keyword tools combine different search engines into one keyword tool.
This is a legitimate way to make real money from home.
I began making this cake for my husbands birthday since he loves red velvet AND my yummy cheesecakes- I thought this would fit the ticket!
BUT
What do you do when you make the cheesecake the day ahead and wake up the next day to a half-eaten cheesecake?! :D
We are going on vacation this weekend, but I guess I’ll have to start from scratch when we get back!
Wonderful post! We will be linking to his particularly great article on our website.
Keep up the great writing.
Hi there! Do you know if they make any plugins
tto protect against hackers? I’m kiinda paranoid about losing everything I’ve worked hard on. Any suggestions?
hi :) i really wanted to know if i can make half of the recipe since im planning to do them like mini cakes, because i don’t really know how to make half a recipe
Erica — October 26th, 2014 @ 9:46 pm
I haven’t halved it before, but that usually works for me. Just half all the ingredients! Good luck :)
Any chance of getting the 6 inch recipe?
Good Morning, I made this cake the past few days for a friends going away dinner, because he loves red velvet cake and I love cheese cake so it was perfect! I’m new to cake decorating, so my roses weren’t all that great and they began to melt so I finished the cake with the cake half in the freezer haha, I’d love you upload a photo but I don’t think I can. This recipe was fantastc thank you!
can u pls share 6 inch cake recipe
planning for my boy friend
looking forward to see ur recipe
Would love the 6″ converted recipe to make my honey for Valentine’s Day!
Erica — January 28th, 2016 @ 3:53 pm
I’m very sorry but I lost the 6″ recipe when my hard drive crashed and I lost my old documents. I would recommend either making the 8″ one or trying to do some math to 2/3 the recipe! Either way, I hope you can enjoy it :)
What kind of cocoa do you use? Natural unsweetened or dutch process? I have been looking for dutch process for another recipe and haven’t been able to find it. All I have found is Hershey Special Dark which is a mix between the two. Would that work for this recipe? Thanks!