For those of you that might not know every detail of my life, I’m in the midst of the application process for a position as a pediatric dentistry resident. I just love school so much I can’t stop after dental school! Hopefully I’ll end up doing another two years to get really good at working with all kinds of kids (and what’s 2 more when I’m going on my 20th straight year of schooling). The whole process has been quite taxing – from getting recommendations and writing personal statements to travelling around the country for interviews in between patients and classes. I have been very lucky to have had great mentors in dental school and beyond, and wanted to thank those professors that helped me along the way, submitted evaluations on my behalf, and were just there for moral support. So far I’ve been granted six interviews out of the ten programs I applied to and I know their letters helped my application make such a good impression! In true nerdy dental fashion, I chose to do a tooth-themed gift for these professors and included a variety of decorated sugar cookies and chocolate chip cookies that I’m sure they enjoyed as fellow dental colleagues.

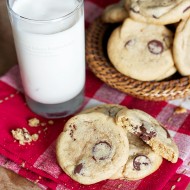
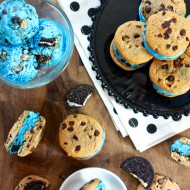
Since the official day of “thanks” is tomorrow (omigosh how did the time go by so quickly?!) I thought this week would be a great time to share these cookies. They should probably be pumpkin flavored and brown/orange/yellow if I really wanted to fit in with the coming holiday, but I just opted for red because when making royal icing cookies, I try to use as few colors as possible! I think mixing in the chocolate chip cookies into the bunch also helped add some color and obviously flavor (I used my all time favorite recipe by Jacques Torres so there was no doubt they’d be good). I’m a sucker for packaging (as anyone who has received our save the date in the past week can attest), so I was delighted to see these craft brown boxes at my local Michael’s that I thought looked great with a red raffia bow. I made sure the “Thank You” cookie was on top and visible through the cellophane window so my professors would know exactly the occasion for this treat. I truly am thankful for the great faculty I’ve had the pleasure of working with and since writing letters of recommendation isn’t always the most fun task, I wanted to make sure they were sweetly rewarded.

Since this is such a busy time of year I hoped to limit the intricacy of these cookies as much as possible while still making them special. I’ve done similar round cookies with a piped border when I made photo transfer cookies for my parent’s anniversary, and I’ve definitely done tooth cookies before (as featured on the ASDA Blog), but this was my first time attempting the lips and teeth combination. These took a few more steps, and a bit of familiarity with the shape of teeth in general, but I thought the extra work was worth it even though they’re not exactly up to my esthetic standards from a dental point of view. I used a similar technique to when I made these flower cookies, by piping every other tooth with medium consistency icing, and then going back a few hours later to finish the rest. This helped keep each tooth defined, without having to outline each one in black or anything. I found the whole process extremely relaxing in the middle of my crazy schedule, and hope all the smiles helped put a smile on my professors’ faces (hardy har har).
Have a Happy Thanksgiving and I hope you have a chance to share something delicious with the people you are thankful for this weekend!
Smile Thank You Cookies
Ingredients:
1 batch sugar cookie dough (Recipe found here)
1 batch royal icing (Recipe found here)
White sanding sugar
Black edible marker
Directions:
Prepare the cookies according to the recipe's instructions and cut them using lips, tooth, and round cookie cutters if desired. Bake as instructed and allow cookies to cool completely.
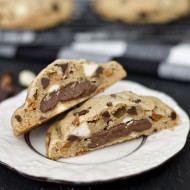
For the tooth cookies I just filled the whole cookie with medium consistency white royal icing and sprinkled with white sanding sugar immediately after. For the Thank You cookies, I first filled in the white circle with the same medium consistency white royal icing and set them aside for a few hours to dry. Then I went back with some stiff red icing to pipe the borders with a small open star tip. The "Thank You" was added later with a black edible marker. For the smile cookies, I started by piping the outlines of the lips with a small round tip with stiff red icing. Then I went back with red flooding icing to fill in the lips. I used medium consistency white icing to make the teeth, but started off making only every other tooth and then waiting an hour or so before piping in the rest.


Good luck with the interview process! I know how stressful/exciting/tiring it is it! Happy Thanksgiving Eve.
Happy Thanksgiving! Good luck with the rest of your interviews! I LOVE the cookies and am totally in love with your blog!
You are such an inspiration!!! I’m a first year dental student and I’m aiming for ortho right now… Congratulations on all your interviews and good luck!
These are adorable! I am also in the process of applying to Pedo right now as well, although I am doing a GPR at the moment. I had 1 interview already and have 2 coming up in the NY area in the next couple weeks.
Good Luck! I hate this stressful interview stuff and waiting and wish we could just find out already!
Beautiful Cookies
Where to you get the Tooth and Lips cookie cutters?