One of my favorite parts of wedding planning so far has been everything revolving around stationery. I think a nice quality card or invitation, regardless of the words inside, sends such a great message. Everything about it plays a part – the colors, the textures, the font, etc. It comes as no surprise that I also love decorating my gifts with care around the holidays, so I thought I’d apply my rediscovered love for stationery to a holiday baked good. If only I had the time and patience to make all of my wedding stationery edible!

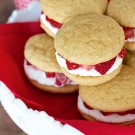
Although I’ve made chewy peppermint ginger-molasses cookies, this is my first time making true gingerbread. The great thing about making cut-out gingerbread cookies is they really don’t spread much once you bake them, so the holes I punched in the ends with a straw stayed open after baking, and I was even able to fit a pretty wide ribbon through a few of them. And if you’re wondering if you need a specific gift tag cookie cutter to make these, the answer is no. I simply cut the shape out of a piece of cardboard and used a paring knife to cut the rolled out cookie dough using my “stencil.” I realize everyone is not always crazy about gingerbread when there are buckeyes and fudge to fight over, but I think it all has to do with how it’s made and how long it’s baked. I’ve had a lot of rock-hard gingerbread in my day, but this recipe is great because it yields the slightest crunch and a really soft center. The sweet royal icing on top is a great complement and helps balance the earthy flavors of the gingerbread, plus the contrast between the deep brown cookie and bright white icing went great with my graphic red paper and burlap adorned gifts!

I kept things extremely simple with the decoration of these edible gift tags – just a simple covering of white royal icing decorated with edible markers and pretty fonts. Although fancy holiday cookies are certainly a treat, it’s great to have a project to get your kids or younger siblings involved in too. Intricate royal icing designs like I used for these snowflake sugar cookies aren’t the best means for a toddler to express their creativity, especially if you’re a perfectionist like me and want your cookies just so! But after baking the cookies and covering them with a layer of plain white royal icing, these gift tag cookies are like a blank slate with endless possibilities for any age thanks to the advent of edible ink markers. I wrapped the cookies in little cellophane bags and once a piece of ribbon was pulled through the hole, I used little pieces of wire twine to close the bags off to help keep things airtight. So get your family together in the kitchen and make gift-giving even more delectable this holiday season!

Gingerbread Gift Tag Cookies
Recipe adapted from Sweet Sugar Belle
Ingredients:
for the gingerbread cookies:
½ cup unsalted butter, at room temperature
½ cup vegetable shortening
1 cup granulated sugar
1-1/4 cup dark molasses
2 eggs
6 cups all purpose flour
1 tsp baking soda
1 tsp salt
1-1/2 tsp ground ginger
3 tsp cinnamon
1-1/2 tsp ground cloves
2 tsp ground nutmeg
for the royal icing:
4 cups powdered sugar
5 tablespoons meringue powder
1/2 cup water
Few drops vanilla extract
Directions:
In the bowl of an electric mixer beat together the butter, shortening, and sugar at medium-high speed until light and fluffy, about 2-3 minutes. Add the molasses and eggs and beat well, scraping down the sides of the bowl as needed.
In a large bowl, whisk together the flour, baking soda, salt, ginger, cinnamon, cloves, and nutmeg. With the mixer on low, slowly add the flour until just combined. Form dough into a ball, wrap in plastic wrap, and refrigerate dough for at least one hour.
Preheat oven to 350 degrees. On a floured surface roll out half the dough to a ½ to ¼ inch thick and use your pre-cut gift tag stencil (I made mine using the cardboard of an empty butter box) and a sharp paring knife to cut out the shapes. Use a straw to punch out a hole in each tag. Transfer cookies to Silpat or parchment paper lined cookie sheets about an inch apart, and bake for 12 minutes, or until the edges are just slightly browned. Allow cookies to cool on the pan for 5 minutes, then transfer to a wire rack to cool completely.
For the royal icing, combine the powdered sugar, meringue powder, water, and vanilla extract in the bowl of an electric mixer. Mix ingredients with mixer on medium-low for 1 minute, then increase speed to medium high and beat for 2-3 minutes. If icing is too thick, add more water and if icing gets too runny, add more powdered sugar. You want a dollop of icing to “melt” back into the rest of the icing in about 20 seconds. Transfer the royal icing to a piping bag fit with a small round tip or a plastic squeeze bottle and cover all of the cookies. I chose to just use 20-second icing for everything, but you could also do stiffer icing as a border and fill in the rest with flooding icing. Allow the royal icing to set for at least 24 hours. When ready, decorate with edible ink markers and adorn your gifts as desired!
For more recipes in the 12 Days of Cookies series, follow along on Twitter with the hashtag #BlogHerCookies.
This post is part of the BlogHer 12 Days of Cookies editorial series. Our advertisers do not produce or review editorial content. This post is made possible by Bank of America and BlogHer.


Hola!
Tu web está genial, me encantaria afiliarlo en mis sitios webs de Turismo y por mi parte te pediría un enlace hacia mis web y asi beneficiarnos ambos con mas visitas.
me respondes a munekitacate@gmail.com
Saludoss!!
What a cute idea!!
Oh wow what a lovely idea. I’d be happy with just the tag as my present! Wouldn’t edible wedding invitations be lovely? Although it might be tricky to remember the details after you’d scoffed them.
This is the best idea ever. Edible tags!!! I’m loving the red stitch borders.
These are fantastic! I totally love this idea and want to do it if I have time… So many holiday baking projects.
Too cute! I believe King Arthur Flour may carry this cookie cutter… I could be wrong, but I thought I saw it in their catalog.
Such a good idea, and so cute! And I love your wrapping too :)
Hi,
This is a great idea! How many cookies does this make? I didn’t see it anywhere in the recipe.
Thanks!
Erica — December 10th, 2015 @ 9:47 am
Nicole, I’m sorry but I didn’t make a note as to how many cookies this makes! It all depends on the size of the tag you end up making, but I would guess about 18-20 based on the size I made above.
Hi! Love this idea. I’m curious how you string the ribbon through the hole of the cookie but still sealed the bags for freshness?