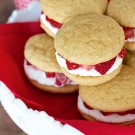
I celebrated my birthday this week, and while I started this blog as a girl in my early twenties, I’m now sitting comfortably in the “late-twenties” slot. Turns out Monday isn’t the most exciting day to have a birthday, so this year I’ve resorted to continually celebrating throughout the week as consolation to myself. Happy hour on Monday, potluck dinner on Tuesday, work party with cake yesterday, and possibly treating myself to a manicure later today. I’m sharing this monster of a cake today in honor of my birthday, but this cake was actually made for a co-resident back in January for his birthday. We have a tradition in our program where the first years are paired up with the second years for seeing orthodontic patients together, and whenever it’s your partner’s birthday, you’re in charge of providing their cake. Usually people bring in fancy store-bought creations, but I knew I wanted to take on the task of making a special birthday treat for Aaron on my own. He got me a delicious carrot cake (with cream cheese frosting, duh) for my birthday this week, but for him I knew it should be chocolate, and tons and tons of chocolate is what he got.
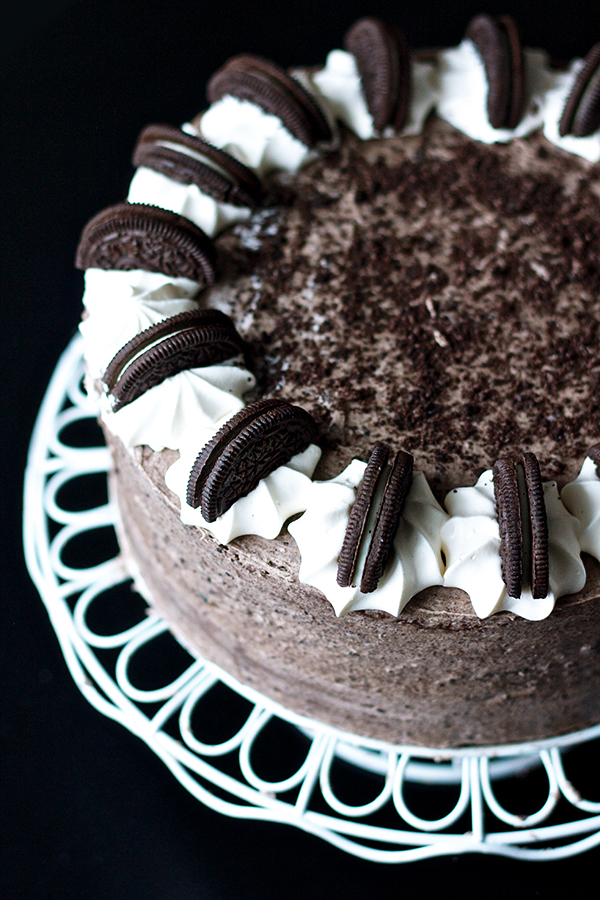
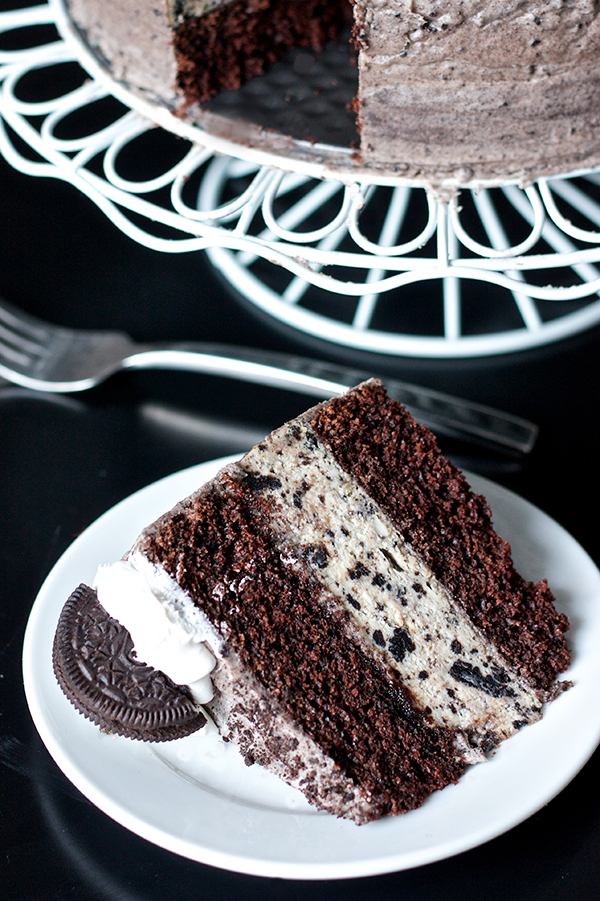
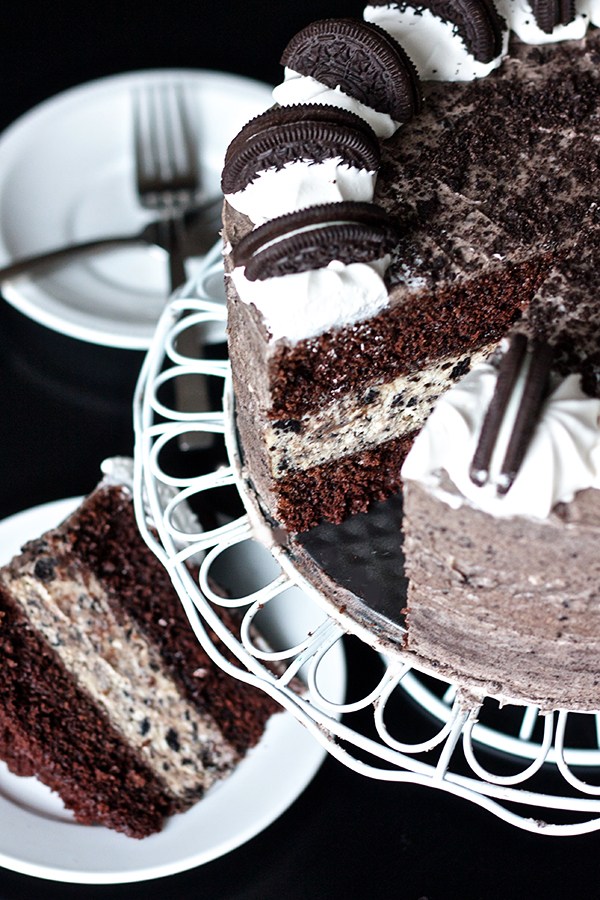
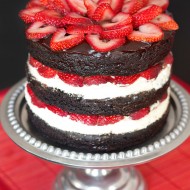
If you’ve been following my blog for awhile you’ll remember the Red Velvet Cheesecake Layer Cake I made my Mom for her birthday a few years ago. It was 2 layers of red velvet cake sandwiched around a layer of creamy cheesecake, frosted in more cream cheese. This cake today is the same idea – 2 layers of rich chocolate cake (my favorite go-to chocolate cake recipe) stacked with a thick layer of cookies and cream cheesecake and slathered in cookies and cream frosting. The smell of this cake alone put me in heaven. I just loooove Oreos! And I somehow managed to sneak in an entire package of Oreos into this cake via the cheesecake, buttercream, and decorations. The frosting might not have turned out as pretty as I had hoped (murky gray wasn’t really what I was going for), but I felt better after hearing that most people at work were convinced that the cake was from a bakery. Plus the taste was divine, and clearly the frosting wasn’t so bad because I couldn’t keep my fingers out of the leftovers!
There are quite a few steps to making this cake, but the intricacies of it all are definitely apparent in the final product, and worth the extra time. I chose a simple decorating technique to keep things simple, and amenable to messiness, so if your edges aren’t perfect either go ahead and throw some extra Oreo crumbs on the sides too. You could cut some major corners by using a boxed chocolate cake mix here instead, but this chocolate cake recipe I used below is so easy, it’s almost worth making it from scratch just to say you did. Break up the baking to a few days so it’s not so bad, and get ready to make the Oreo-lover in your life very, very happy!
Oreo Cheesecake Layer Cake
Yield: 1 8" cake
Ingredients:
for the cookies and cream cheesecake layer:
20 oz cream cheese, at room temperature
3/4 cups granulated sugar
1/2 tbsp vanilla extract
1/4 tsp salt
2 large eggs
1/2 cup sour cream
7 Oreo cookies, chopped
for the chocolate cake layers:
1-3/4 cups all purpose flour
2 cups granulated sugar
3/4 cups cocoa powder
2 tsp baking soda
1 tsp baking powder
1 tsp salt
1 cup buttermilk
1/2 cup vegetable oil
2 eggs, at room temperature
1 tsp pure vanilla extract
1 cup hot coffee
for the cookies and cream frosting:
3/4 cup unsalted butter, at room temperature
4 oz cream cheese
1 tsp vanilla extract
3-1/2 cups powdered sugar
2 tbsp milk
1 cup whipped cream or Cool Whip
15 Oreo cookies, crushed
for assembly:
8 Oreo cookies, cut in half
1/2 cup whipped cream or Cool Whip
Crushed oreo crumbs for decoration
Directions:
for the cookies and cream cheesecake layer:
Preheat the oven to 325 degrees. Line the bottom of an 8" springform pan with parchment paper and wrap the bottom half of the pan in tinfoil. In the bowl of an electric mixer beat the cream cheese until smooth and fluffy, then slowly add the sugar. Beat in the vanilla and salt until smooth. Add the eggs one at a time, scraping down the sides between each addition and beating well. Mix in the sour cream and gently fold in the chopped Oreos.
Place springform pan into a larger pan and pour boiling water until it comes up halfway up the sides of the springform pan. Bake for about 45 minutes, or until the center is just set. Remove pan from water and allow it to cool for 20 minutes. Run a knife around the edge of the pan and set aside to cool completely. Remove outer ring of pan, leaving the bottom piece, wrap cheesecake with plastic wrap, and store in the freezer until ready to assemble.
for the chocolate cake layers:
Preheat the oven to 350 degrees. Prepare you 8″ cake rounds by greasing and flouring them. Whisk together the flour, sugar, cocoa, baking soda, baking powder, and salt together in a large bowl until well combined.
In the bowl of an electric mixer, combine the buttermilk, oil, eggs, and vanilla and beat until well mixed. With the mixer on low speed, slowly add the dry ingredients into the wet. With the mixer still on low, add the coffee and stir just to combine. The batter will be very thin, don't worry!
Split the batter into the prepared pans and bake for 35-40 minutes, or until a cake tester comes out clean. Cool in pans for 30 minutes, then turn onto a cooling rack to cool completely. Level the cakes with a serrated knife if necessary. You can wrap the layers in plastic wrap and store in the freezer until ready to use. (Storing in the fridge will dry the cakes out)
for the cookies and cream frosting:
In the bowl of an electric mixer, beat together the butter and cream cheese for 2-3 minutes, until light and fluffy. Add the vanilla and continue beating. Reduce the mixer's speed to low and slowly add the powdered sugar. Once incorporated, add the milk and increase the speed to medium. Beat for another 1-2 minutes until smooth. Turn off the mixer and gently fold in the whipped cream and crushed Oreos with a rubber spatula.
for assembly:
Place one layer of the chocolate cake down onto a cake round, or the plate you intend on serving the cake on. Cover layer with a thin layer of frosting, then place the cheesecake layer on top. Spread another thin layer of frosting and place the second chocolate cake layer on top. Cover the entire cake with a thin layer of frosting and place in the fridge for about 10 minutes to allow your crumb coat to set. Once set, cover the cake with another layer until the edges are fully covered and smooth.
Sprinkle Oreo crumbs onto the top of the cake. Load whipped cream into a piping bag with a large star tip and pipe evenly spaced dollops around the outer edge. Top each dollop with a halved Oreo. If your cheesecake layer was frozen for storage, allow the cake to sit out on the counter for an hour or in the fridge overnight to thaw. I actually froze the entire cake in a cake box once completed and took it down the night before and the consistency was perfect.


Happy Belated Birthday! Sounds like you are having a great one! I was curios as you whether or not you bake two cakes, one for the occasion and one for photography purposes? I ask as I am having a hard time blogging the insides of cakes.
Thanks!
Erica — March 7th, 2014 @ 2:29 am
Thanks Hana! That’s a great question actually. Since I’m usually making cakes for family or friends, I go ahead and take a slice out ahead of time to photograph it. Then I carefully put it back in place, and have some extra frosting to smooth out the edges and fix the decorations on top. Usually it’s almost impossible to tell once the piece is hidden again! If someone was paying me to make a cake I obviously wouldn’t do this, but my friends and family don’t seem to mind as much :)
Muchas gracias, Esto se ve riquísimo. Lo voy hacer.
it looks yummy!
Holy cow…this is amazing! Pinning for later…and by later, I mean later this afternoon. :-)
Happy Birthday! I spotted this on Pinterest this morning and then again on Foodgawker so I figured I better come check it out! I’m going to peek around your blog a bit more! I hope you have a wonderful Birthday!
Wow! This sounds amazing.
Happy Belated Birthday! Your cake – cheesecake looks delicious! Cheesecake is on of my favorites!
check out my recent post, Hot Fudge Cake!
Michael :-)
http://michaelswoodcraft.wordpress.com/2014/03/17/hot-fudge-sauce-chocolate-cake-and-ice-cream/
Hey Erica! This looks amazing. Ive been faithfully following your blog for years. I’m just wondering how long this cake will keep and how to store it. Thanks!
Erica — April 23rd, 2014 @ 3:15 pm
Hey! So you can make the cake layers whenever you want, and can wrap them tightly in seran wrap and keep in the freezer. Then, when you’re ready to frost, you can let them sit out at room temperature for a bit, and frost it completely. Once frosted the frosting serves as a protection against drying out, so I would recommend storing it in the fridge until you’re ready to serve (but probably not longer than 2-3 days). Right before serving I would let it sit out on the counter for an hour to thaw just a bit so the frosting is soft! Hope this helps :)
As my friend is a complete oreo addict, I decided to bake her this cake for her birthday. It was an absolute raving success! The die-hard chocolate fanatic men were over this cake as you could only imagine a bunch of women indulging after a 3 month no carbs allowed stint. Thank you for sharing this lovely recipe! Can’t wait to make more people happy with this creation!
Erica — May 15th, 2014 @ 4:38 pm
So glad you and everyone loved the cake so much!! It’s a great one :)
Awesome cake! Can i wrap the cake layers in plastic wrap and leave them at room temp overnight?
Erica — May 16th, 2014 @ 7:49 pm
Thanks! I would refrigerate the cheesecake but the cake layers can be left at room temperature overnight. I hope you enjoy it!
Ok I’m a little confused on the pat that says: Place springform pan into a larger pan and pour boiling water until it comes up halfway up the sides of the springform pan. Bake for about 45 minutes, or until the center is just set. Remove pan from water and allow it to cool for 20 minutes.
Can you please explain? Little lost one – Irene :O)
Erica — June 11th, 2014 @ 11:36 am
So basically what you want is for your cheesecake to bake inside a water bath, but you don’t want the water to get up the sides of your pan and into the batter. This means that you’ll want to place your springform pan inside a larger pan that’s then filled with some water. When the cheesecake is baked, you don’t want it cooling in the water bath, so you just remove it and cool on the counter for 20 minutes. I hope this helps!!
there’s no butter in the chocolate cake recipe?
Erica — June 23rd, 2014 @ 4:11 pm
Nope, all the fat comes from the oil :)
Hi Erica, this looks amazing! Going to try it out this weekend – just reading over the recipe, 325 degrees seems like a very hot temperature, is this for a fan forced oven? Or would you lower it for a fan forced one?
Thanks!
Erica — August 1st, 2014 @ 8:15 am
Just want to clarify that I mean 325 Fahrenheit! Hope this helps and enjoy the cake :)
I’m making this cake today, Its perfect for a friend but todays cake is going to be for me to taste, Lol. I’m pretty sure Im going to like it, I have done the chocolate cake like your recipe a lot of times and its the best chocolate cake,never done a cake with a cheesecake filling and never tasted either. Thanks for the recipe and I love how clear your recipes are.
Hi Erica, this cake looks delicious!
I’m definitely going to make it for my other halfs birthday in a couple of weeks!
Will the recipe work without adding the coffee? And if so will I need to add anything extra in to compensate for this?
Thanks in advance :) x
Erica — October 6th, 2014 @ 9:42 pm
You can just sub water :) Enjoy!!
Hello Erics! I’m going to cook this for tomorrow night! Could you please clarify if 18” is 18 cm? I need to buy an appropiate mould for this. Thank you!
Erica — December 23rd, 2014 @ 9:59 pm
Inches!
This cheesecake looks sinfully delicious. I wish there was a no-bake version of this.
I’ve made several cheesecakes over the years…even recently
Bought a new fangled pan w it’s own water vat…it was a total bust…
EVERYTIME I’ve tried to do the waterbath w the spring form
Pan down in water w layers of foil. …all I end up w is a very soggy
mess. ……last time I just placed the s.f. pan over the top of
a pan of water….also I used to bake them at 400 for 20 mins
then just turn down the oven to 200 and bake for remaining
time….
Please tell me how in the world you keep the water out ….
or any other ideas…
Hi!
Would it be possible to bake this say 10 days before, and keep it in the freezer, then assemble it the day before I would actually need it? Or would the cheesecake part not do well in the the freezer for that long? Thanks!
Erica — February 8th, 2015 @ 7:06 pm
Yes, you can totally do that! Just wrap each layer tightly in plastic wrap before freezing them, then once they’re out at room temperature for a few hours they should be perfectly defrosted. Enjoy!
Hi, I just started making this and noticed there are no eggs listed in the ingredients of the chocolate cake layers, yet the directions say to beat in the eggs? How many eggs are needed?
Thanks,
Roberta
Nevermind, sorry, I see it now–2 eggs, I don’t know how I missed it–I read it over several times!
Hi, Can you tell me approximately how many people it will serve?
Erica — February 26th, 2015 @ 1:51 pm
I would estimate about 15 people depending on how large you cut the slices!
I’m making this cake for the second time because it was such a big hit the first time! What size decorating tip did you use for the stars? If you have one you recommend that would be appreciated as well!
Erica — March 26th, 2015 @ 2:12 pm
Yayy so glad! I think it was an Ateco #865 – it’s just a really big star tip. Hope that helps!
Erica, would it be possible for me to use a 9 inch pan? I only have a 9 inch pan available to me.
I’m making in now the cheesecake turned out fine so far but the chocolate cake is over flowing as a type this and seems very soupy after adding the hot coffee. What’s the deal the measures can’t be right. It’s to soupy. Looks like I’m going to have to redo the chocolate cake and use a different recipe. My house smells awful from the burning chocolate. Please fix the measures.
Erica — December 1st, 2015 @ 8:31 am
The batter for this chocolate cake is very liquidy compared to other recipes, but it always turns out wonderfully for me. Did you use two 8″ pans for the cake layers? It shouldn’t overflow if you divide the batter equally between the two. I’m sorry it turned out so poorly for you!
Hi,
So I’m baking this as we speak. Done the chocolate layers, which were a very similar recipe from my own chocolate cake, and now I’m going to do the cheesecake layer.
I have a question though. I plan in assembling the cake tomorrow morning (so, in 24h), I know I shouldn’t keep the chocolate layers in the fridge, but what about the cheesecake layer? Should it be kept outside, the fridge or should I really freeze it for the day and take it out later tonight to defrost? Never done a cheesecake before so I don’t really know how they “work”.
Thank you in advance! And thanks for the recipe! I usually did the Oreo cake with a simple white cake with Oreos in the middle but I think (hope) the cheesecake version will be much more exciting!
Erica — February 18th, 2016 @ 8:11 am
Hi Marta! If you’re assembling the cake in 24h, I think it’s best to store the cheesecake in the fridge. And then once everything is frosted, you should store the whole cake in the fridge until you’re ready to serve. And then I would recommend leaving the cake out for at least 30 minutes before serving it so it’s not actually chilled when you eat it. Enjoy!
Thank you so much. Keeping it in the fridge won’t dry out the chocolate cake though?
So I baked the cheesecake according to directions, took it out when still wobbly at the center but set around the edges (about 1 hour of cooking). Allowed to cool for an hour before taking out of the cake pan but i still found it was so delicate and wobbly. I’m actually not sure I’ll be able to cut it (it’s way too high) and transfer it to the cake, or even spread frosting on top, without it crumbling. Before leaving for work I just put in the fridge and hoped for the best. If when I get home it’s still too fragile I guess I did underbake it, and I’ll have to bake a regular cake with Oreos instead. I was really excited about this but the cheesecake scares me. Haha
Hi, this cake looks fantastic and thanks for sharing this recipe. I started to make the cream cheese frosting but for some reason it is looking really soft. Have not added in the whipped cream yet as am worried it will not make much difference and will have to go to waste. What should I do? Any suggestions will help, thanks.
Is the cake really 18 inches?Because that is 45 cm…..
Erica — July 31st, 2016 @ 9:24 pm
No, it is 8 inches, not 18
Same thing happened to me. two 8 inch cake pans and a giant mess in my oven. I wonder if your cake pans are slightly deeper than the average?
i have made this cake 3 times tomorrow will be the 4th for my sons birthday he absolutely loves it as oreos are his favourite. they turn out perfect all the time and have never had a problem x
I am a baker. Cheesecake layer went fine. The chocolate cakes did as many on here remarked. 2 – 8″ rounds overflow in the oven. I followed the recipe to-the-letter! Either these were made in 9″ pans or the ingredient amounts are off or the 8″ round cake pans were deeper than normal 8″ round pans because the overflow happened as happened to others. BEWARE!
I made this for a birthday gathering and it was a hit. In fact, it was a little too tall for my cake taker and I smashed it. It still tasted amazing.
The cheesecake layer turns out a little soft, or at least minded, I stuck it in the freezer and stacked it when I put it together. It turned out just fine and I was very happy with my product.