Posts like these are what I love most about this little blog of mine. The creative process involved with developing recipe ideas is extremely rewarding – and it’s such a great escape from my left-brain dominant days in dental school. The process for these cookies went something like this: a few years ago I came across the method of forming sugar cookie dough into a loaf form and then cutting little slices to look like bread. Then at some later time I thought, hmm what if I used peanut butter flavored dough. And filled them with jelly. And then maybe I could use food coloring to paint on “crusts”! And all of this is eventually followed by giggles and giddy dancing that Ryan gets the privilege of witnessing every so often. I truly was giddy after finishing this batch of cookies – they are so freaking cute and everything I hoped they would be as I was dreaming them up! And the fact that I had them ready for Back to School season just puts it all over the top :)
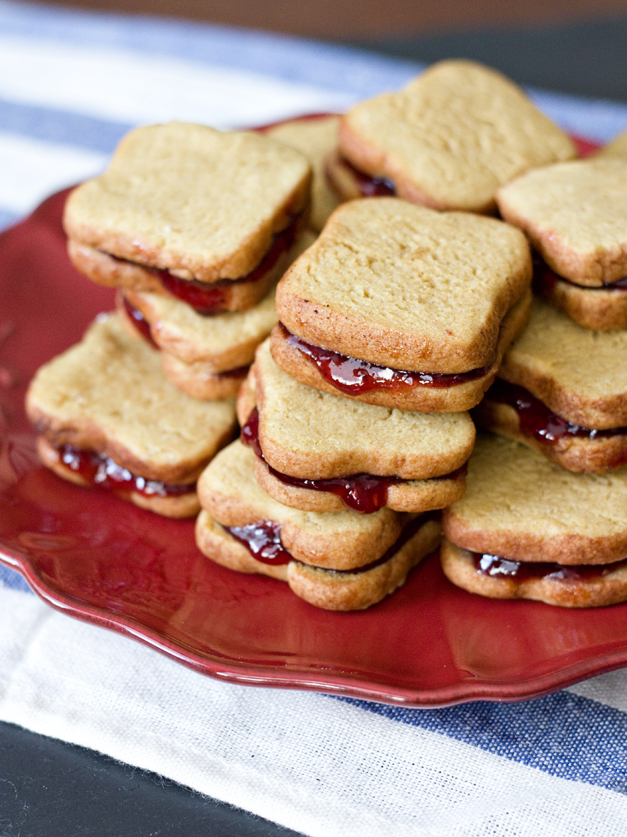
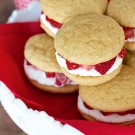
If you scroll down to the recipe instructions, you’ll see a photo of the “loaf” of cookie dough I formed to make these little slices of cookie bread. No little cookie cutter required for these babies! Which also means no rolling dough out onto your counter. Which of course means no cleaning up flour from all surrounding surfaces. Win, win, win. Doesn’t hurt that the resulting product is also really yummy – the perfect balance of salty peanut butter flavor worked into the cookie dough combined with the sweet jelly filling. Although PB&J’s are regarded as kiddie food, it’s one of my favorite sandwiches that I crave often. We don’t keep cold cuts around, so when I want a sandwich, I immediately go for the peanut butter and jelly jars. There’s nothing childish about this classic combination – it’s seriously delicious and perfect in cookie form too!

It’s amusing that I’m sharing these cookies today as a Back to School themed treat since I’ve been “back to school” since July, with only a short two week summer break. But I guess that’s more than most of my friends who are real people in the big, big world and get no summer break at all, so no complaints here! It is back to school for the first and second years this week though, and the lack of parking this morning was a stark reminder that they’re baaaaack! Regardless, it feels so great to be a fourth year – pretending to walk around like we know what we’re doing, making plans for life after dental school (it does exist!), and reflecting on how far we’ve come after just one year in the clinic. I have so much to look forward to this academic year: choosing a residency program, graduating from dental school, getting myself a husband – just to name a few. And as long as I keep churning out adorable treats like this along the way, I know it’ll be a great year!

Peanut Butter and Jelly Cookie Sandwiches
Yield: ~ 20 sandwich cookies
Ingredients:
For the peanut butter cookies:
1/2 cup creamy peanut butter
1/4 cup + 2 tbsp granulated sugar
1/4 cup + 2 tbsp light brown sugar
1 egg
2-1/2 tbsp milk
1/2 tsp vanilla extract
1-1/4 cups all purpose flour
1/4 tsp baking powder
1/4 tsp baking soda
For the "crust":
2 tbsp vodka
Few drops brown food coloring
For the filling:
Jelly flavor of your choice
Directions:
In the bowl of an electric mixer, beat together the peanut butter and sugars until light and fluffy, for 2-3 minutes.
Beat in the egg, milk, and vanilla until well combined.
In a separate bowl, whisk together the flour, baking powder, and baking soda. With the mixer on low, gradually add the flour mixture to the peanut butter mixture and beat until just combined.
Divide dough in half and roll each half into a rectangular block. Using your fingers, pinch along the middle of the top and along the two sides to form indentations along the length of the block so the dough looks like a bread loaf. (See photo below). Wrap each half in seran wrap and refrigerate at least one hour or overnight.
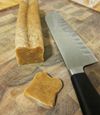
When dough is chilled, unwrap the dough and use a sharp knife to cut slices of "bread" in 1/4" thickness. Preheat oven to 350 degrees.
Place 1" apart on a parchment paper or silpat-lined cookie sheet and bake for 7-9 minutes, or until edges just begin to brown. Cool for 5 minutes on the pan, then transfer to a wire rack to cool completely.
To paint crusts onto the baked cookies, combine vodka and brown food coloring. Use a clean paint brush to brush mixture on the sides of all the cookies. Using vodka instead of water will prevent the cookies from getting soggy since the alcohol will evaporate!
To make the sandwiches, take one cookie slice and spread with jelly. Match cookie with another slice of similar size and make your PB&J sandwich!


So cute. Great tip about the vodka!
Ahh these are so adorable!!!
so stinkinly cute! love that there is no rolling too! (now if my kids could eat peanut butter, maybe I’ll try with other flavors tho) thanks for sharing!
Yum! These are super duper cute!
Adorable! Totally love these cookies…super fun! :)
Adorable.
Those might have been the cutest things I’ve ever seen! Being Swedish I’ve never had a PB&J sandwich. I actually didn’t understand the glory of peanut butter until a year ago or so. So many wonderful opportunities missed. The horror! Will most certainly have to give these a try though!
So, so, so, so, CUTE!
Carmen
http://bakingismyzen.wordpress.com
These are awesome. So cute!
Cute beyond measure! As for post-graduation plans, I think “getting a hubby” should be moved up a spot, since it’s a universal thing. (Says the slightly-panicky-soon-to-be-post-grad-gal.) Thanks for sharing!
Very cute. Great idea and I bet they’re yummy!!
These are just too darn cute!! The crust puts them over the top – love it!
These are adorable! Pinned!
Those are beyond cute!!
So cute! I love anything to do with PB&J!
This is seriously so adorable!! I love the vodka and food coloring idea. Never knew!
These are like the cutest thing ever! I know my kids will LOVE these!
wow.. they look adorable!! Great idea.
p.s. First time at your place.. love it :)
I am underage and can’t buy vodka, what do I do?
Anonymous — August 24th, 2012 @ 1:47 pm
Please? I was wondering if there was an alternative… :(
Erica — August 24th, 2012 @ 1:49 pm
Yes, you can just use water, it shouldn’t be a problem!
I would be giddy if I made these too! They are the cutest thing I’ve ever seen :)
These cookie sandwiches are too cute! Any kid would LOVE to enjoy these at lunchtime… make all their friends jealous. SUch a creative recipe! And I love that there is no dough rolling involved!
Soooooo cute! Love this idea. :) Great job!
These are much too cute! What a beautiful idea!
These are so cute! I’m a sucker for anything miniature!
Do you think these could be baked in the assembled sandwich form with the jelly on before they went in the oven? I know the jelly would probably firm up but it seems like they’d be a little easier for packing that way.
Anonymous — September 12th, 2012 @ 12:27 am
No, the jelly will melt, run onto the baking sheet and burn!
Adorable!! Love that there is no cookie cutter involved!
Too stinkin’ cute!! I’m going to have to make these for my daughter’s lunches.
You are awesome! What a great idea!!!
http://www.shilohstaste.com
These are so cute! And I love the combination of peanut butter cookies with jelly. And that you took the time to make perfect little crusts for each sandwich :) I’m featuring this post in today’s Food Fetish Friday (with a link-back and attribution). I hope you have no objections and thanks for the inspiration…
Very cute! So much so that I made them last night. Wasn’t sure what temperature to cook them (maybe I missed it?) so I went with 350– which may be a little high. Either way, they came out great and are delicious!
Thanks, great idea!
very, very cute! I had to do a double take!
These are so adorable!
I ran across these the other day and they’re all I can think about baking – might have to do a copycat bake myself (and credit you of course), they’re just so cute!! Makes me feel like being more imaginative with new bake ideas, too!!
These re so clever. Love them!
Great Idea!! I hope to try these soon :) Thanks
So cute! I love your recipes…I’m definitely making these for tailgating this coming weekend! I’m guessing you bake them at 350?
So cute and creative!
Waaaaant! They look delicious!
This needs a “Open the bottle of vodka, pour a glass for yourself” step.
These are just the cutest. Hope to make them sometime soon!
These are too cute! How long will they last before the jelly makes the cookie soggy? I plan on making them for a party on Saturday, but was hoping to assemble them on Friday evening.
Erica — October 9th, 2012 @ 3:41 pm
They shouldn’t get soggy overnight – I had them in the fridge for 2 days and they were still holding up well! Good luck :)
Are the cookies soft? or does the jelly squeeze out when you try to bite the sandwich?
Erica — October 9th, 2012 @ 3:41 pm
A little of both – they’re sturdy enough so you don’t make a huge mess when you bite into one, but soft enough so just a little bit oozes out the side. If you just adjust your bake time to the lower end of things, you might end up with even softer cookies – but I liked the texture they turned out!
I tried these for a birthday party this weekend and they were a hit!! Everyone loved them! They took a me while to make, but I had fun! :-) Thanks for sharing such a great recipe!
CAn u paint the crust on previous to baking or even before refrigeration
I’m not sure if the crust color would stay through baking since I haven’t tried it. I think it would work though since the baking process might bake off the vodka, but leave the color behind. Just not sure though, but good luck!
Why not roll the cookie loaf in brown sugar for the “crust” :)
Can you use rum instead of vodka? I don’t have any vodka. Lol dumb question, the alcohol fully disappears? I can give these to my kids?
Erica — March 15th, 2013 @ 7:33 pm
Yes, rum will be fine. And the alcohol evaporates and won’t be a problem for kids!
These are so cute, I can’t wait to make them!
This recipe was featured in Krafty Cards etc.’s Recipe Round-up. View it at: http://kraftycardsetc.blogspot.com/2013/04/recipe-round-up.html. Thanks for the inspiration!
Maria
Krafty Cards etc.
I’m having trouble envisioning the rectangular shape turning into the bread loaf look. In the description, you say to refrigerate the two halves and yet they look very solidly like one in the pic. Want to make the dough now and bake them tomorrow. Bought the brown food coloring at Chef Central today – always have vodka in stock in the freezer :)
Can you walk me through it? I roll the half and then flatten it to resemble a rectangle and here’s my mental block, do what? pinch, indent? #nervous
Erica — August 29th, 2013 @ 11:19 am
Yes, form the dough into a long rectangular block, then you pinch and form the sides to make it look like a very long loaf of dough. Did you see the picture embedded in the recipe? That should be your final product so when you cut slices, they look like little pieces of bread. Good luck!!
k, made the dough – was very soft. Hope it firms up enough to shape the logs!
don’t hate me! The dough is terribly soft. when I cut the log (that looks like a loaf of bread!) the dough is so soft I have silly little slices. Also, the pbutter and sugar combo did not come out light and fluffy after beating – more like grainy.
What did i do wrong!???
Erica — August 29th, 2013 @ 10:17 pm
Hmm I’m so sorry this didn’t work out for you! If your slices look silly, you can kind of use your fingers to shape them into better shapes. I’m not sure what you did wrong, but hopefully they still came out okay??
I made these today in celebration of National PB&J Day. The cookies turned out wonderful! They were SO much fun to make, AND easier than expected! Will be making again!
Could I make these with almond butter? I’d love to try them, but my son can’t have peanut butter.
Erica — May 19th, 2014 @ 4:19 pm
Yes, I think that would work perfectly! Good luck :)
Have you ever tried brushing the food coloring on the loaf before baking? I find these adorable but the time-consuming issue of painting ever bread slice is a deterrent to me.
Anyone tried using vanilla extract as the brown/alcohol coloring?
I love the look of these cookies. Can’t wait to try them but I will try powdered cocoa instead of vodka/food colour.
Instead of using vodka and brown food coloring all you have to do is paint it with vanilla! Some of the ingredients in this food colorings are not that good! And this is great alternative!
Why not roll the cookie loaf in brown sugar for the “crust” :)
Why not roll the cookie loaf in brown sugar for the “crust” :)
Why not roll the cookie loaf in brown sugar for the “crust” :)
warung son4d menyediakan berbagai akun paling gacor untuk semua permainan, bergabunglah segera bersama kami, hanya di situs resmi
Why not roll the cookie loaf in brown sugar for the “crust” :)
RTP tinggi, jackpot tiap hari! Cuma di PAWANGSLOT
Why not roll the cookie loaf in brown sugar for the “crust” :)
Why not roll the cookie loaf in brown sugar for the “crust” :)
Why not roll the cookie loaf in brown sugar for the “crust” :)
Why not roll the cookie loaf in brown sugar for the “crust” :)
Why not roll the cookie loaf in brown sugar for the “crust” :)
Le plugin WordPress Content-spinning vous aide à générer du contenu de qualité qui se retrouvera en haut des moteurs de recherche.
You have made your point very nicely!!
Why not roll the cookie loaf in brown sugar for the “crust” :)
Pututogel : Perpaduan Rasa Boeuf Terbaik Di Surabaya Dengan Citra Rasa Lezatt
Why not roll the cookie loaf in brown sugar for the “crust” :)