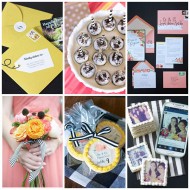
I’ve been having so much fun with a number of wedding crafts that I’ve decided to share a few of my DIY projects here on the blog for anyone that’s interested. And if you’re only here for a weekly dose of sugar, stay tuned for another post in a few days with the normally scheduled programming – but for now, Save the Dates! Well, more specifically just the envelopes, since the save the dates themselves were simply magnets I designed around a photo from our engagement shoot and then ordered online. But since I’m obsessed with all things stationary and papery, I decided to go all out with the envelopes and labeling.

For the save the dates, I wanted something whimsical and fun – a tad less formal than I plan on being with the invitation, and definitely more vibrant. I am known for my love of the color yellow, so I didn’t think twice about choosing these petal envelopes from the Paper Source in “Curry”. But you can do this design on any kind of envelope, I just thought the petal ones were purrrty. In addition to some envelopes, you’ll also need rectangular sticker labels printed with addresses, a hole punch, an index card or piece of cardstock, scissors, and a black marker. I used these address labels from the Paper Source and I loved how they have a matte finish and some thickness to them. The labels come with a Microsoft Word template, and I just made sure to tab everything over a bit within each label to make room for the tag shape and hole on the left side of each label. I also printed our return address on small circle labels with a cute little monogram that were used to close the backsof the envelopes.

To make the tag-shaped labels, I stuck one of the rectangular labels to the index card, cut it out, and then cut off 2 corners. This becomes a stencil or guide to help cut all the address labels to the correct shape. Just simply lie the stencil over the address label in your hand and snip off the corners based on the shape of the stencil. Punch a hole in the in the tag and lay it on the front of the envelope at an angle. Then, use a black marker or Sharpie to draw a loop-de-loop that goes around the punched hole and up to the top of the front of the envelope.

That’s it! Now just do it 100 more times and you’re ready to go, haha. It was definitely more labor intensive than simply throwing some address labels on the envelopes included with the magnets, but with a strong scrapbooking past, I love doing things like this. We also added a baker’s twine detail inside the envelope and it was actually kind of fun to set up an assembly line with Ryan putting them all together. We just sat there one night, not even with the TV on, and folded, stuck, tied, and stamped everything side by side. I will always remember that night, and I definitely think these little touches made our Save the Dates that much more special, and more personal too. It’s the little things that count!

Here is a recap of the links for the materials I used:
- Paper Source Petal Envelopes, in Curry
- Paper Source Rectangular Labels, in EcoWhite
- Paper Source Small Round Labels, in EcoWhite
- Magnets from MagnetStreet.com, custom design


Those are the cutest!!! I love them!
These are adorable! I got married last summer and I wish I’d seen this idea back when I was planning. Congratulations and best of luck!
P.S. If you need help finding musicians for your big day, I’ve got a lot of contacts along the shoreline and at Yale (including myself on piano).
Really cute magnets! I hope to see more craft blogs :)
These are WONDERFUL! My bestie’s wedding is coming in July and with the invention of Pinterest – all kinds of cool things are coming to light! Pin, Pin away!
I adore this. What a cute way to make a label.
These are fabulous! What font did you use for “kindly deliver to:” and the address, please?
Erica — August 9th, 2014 @ 10:48 pm
Kindly deliver is in Lobster (http://www.fontsquirrel.com/fonts/Lobster) and address in St. Marie Thin (http://www.fontsquirrel.com/fonts/st-marie). Hope this helps and good luck!